
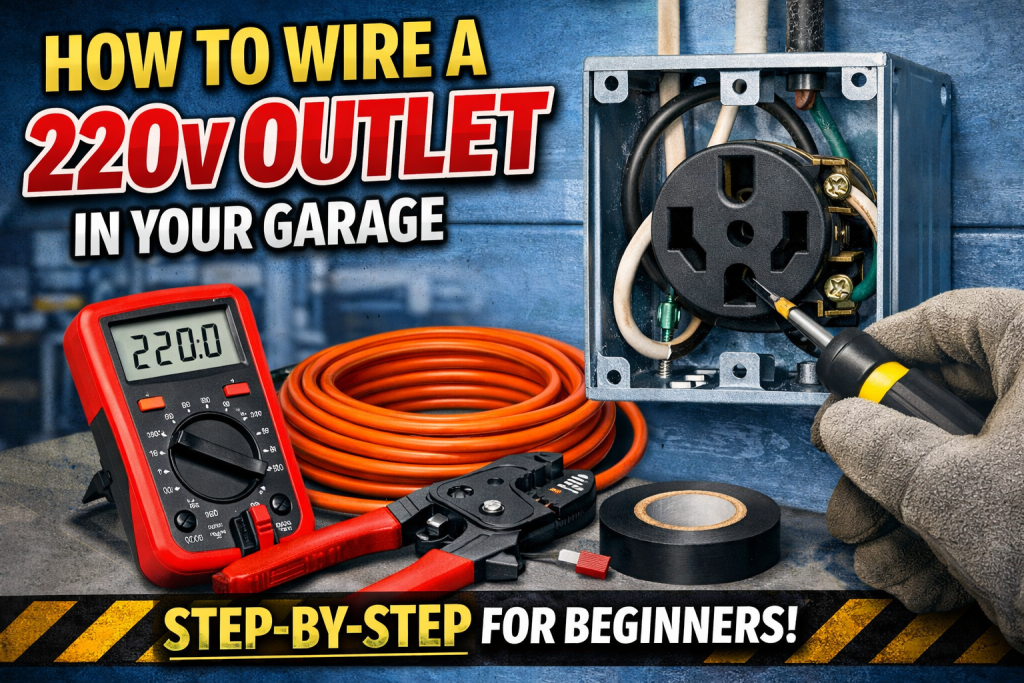
You just bought your dream tool—a 60-gallon air compressor, a MIG welder, or a cabinet table saw. You got it into the garage, unboxed it, and realized: The plug doesn’t fit.
Most heavy-duty shop tools run on 220V (or 240V). Your standard wall outlets are 110V. You have two choices: Call an electrician and pay $400–$600 for a 30-minute job, or spend about $60 at Home Depot and do it yourself. This guide is for the DIYer who wants to build a serious shop without the serious price tag.
Table of Contents
DIY 220V Outlet Installation for Garage Tools
-
Difficulty: ⚡⚡⚡ (Medium/High – Requires working in the breaker panel).
-
Time: 60–90 Minutes.
-
Cost: ~$60 (Wire, Breaker, Outlet, Box).
-
Safety Rule: TURN OFF THE MAIN BREAKER. If you are not comfortable with this, stop now.
The Parts You’ll Need:
-
Breaker: Double-Pole (check your panel brand).
-
Wire: 10/2 (for 30 amps) or 6/3 (for 50 amps).
-
Receptacle: NEMA 6-50 (Welders) or NEMA 14-50 (Ranges/EVs).
Before you grab your tools, consider an alternative: if your new tool is on the smaller side, you might not need a 220V outlet at all. You could convert your 220V tool to run on a standard 110V circuit. This is a great option for smaller compressors or tools where you can accept a slight reduction in power. We have a full guide on How to Convert a 220V Air Compressor to 110V if you want to explore that route first.
If you’re ready for the full-power upgrade, let’s get started.
Critical First Step: Choosing the RIGHT Wire Gauge
Let me save you from the most common and dangerous mistake: using the wrong wire. Here’s the truth: Standard household wire will fail. That 14/2 or 12/2 Romex you’ve used for lights and outlets? It can’t handle 220V power for heavy tools. It will overheat, melt, and could start a fire in your walls.
Think of it like this: you wouldn’t water your lawn with a drinking straw. Don’t power a welder with wire meant for a lamp.
Your Simple Wire Guide:
Match your tool to this chart. Don’t guess—your safety depends on it.
-
For 20-Amp Tools: Use 12-gauge wire (yellow sheathing).
-
For 30-Amp Tools (Most Air Compressors): Use 10-gauge wire (orange sheathing).
-
For 50-Amp Tools (Welders, EVs): Use 6-gauge wire (black sheathing).
My rule is simple: When in doubt, go thicker. Thicker wire (lower gauge) is safer. You can never have wire that’s “too safe”—only wire that’s more reliable. Get this right, and you’ve built a solid foundation. Get it wrong, and you’re risking everything.
The “Red Wire” Secret: Your 220V Wiring Made Simple
Okay, here’s where most DIYers scratch their heads. Everything you know about wiring is about to get flipped upside down. Let me explain it this way: Think of your standard 110V outlet like a one-way street. The black wire is the “live” lane carrying power TO your tool. The white wire is the “return” lane bringing power BACK to the panel. The bare wire is the emergency shoulder (ground).
Now, your 220V circuit is a two-way highway. You have two black (hot) wires both carrying power TO your tool. There’s no white (neutral) needed because your tool uses both hot wires to complete the circuit. The bare wire is still your emergency shoulder.
Why 220V = 110V + 110V
Here’s what blew my mind when I first learned this: Your electrical panel doesn’t actually create 220V. It creates two separate 110V “legs” that are out of sync with each other. When you combine these two opposing 110V legs through your tool’s motor, you get 220V of usable power. It’s like two people pushing on opposite sides of a wheel—together, they create way more rotation.
The Critical Safety Hack (Don’t Skip This!)
Here’s your simple 3-step process. First, buy standard Romex (like 10/2 or 6/2) with black, white, and bare wires. Second, wrap red electrical tape around the WHITE wire at BOTH ends. Third, now treat it like a black wire—because it is! Why the red tape? Because in five years when you’re adding another outlet, that white wire will scream “I’M HOT!” instead of whispering “I’m neutral.” This small step prevents someone (maybe you) from getting shocked thinking it’s safe to touch.
⚠️ Pro Safety Tip: While you’re at the store, also grab a non-contact voltage tester (about $15). After you turn off the main breaker, use it to double-check that wires are truly dead before you touch them. Trust me—this $15 tool is cheaper than an emergency room visit.
Where These Wires Actually Go:
The black wire goes to one side of your double-pole breaker. The white-with-red-tape wire goes to the other side of the same breaker. The bare ground wire goes to the ground bus bar in the panel. That’s it. You’ve just created a 220V circuit by using two 110V paths.
Quick tip: Buy the red electrical tape when you get your wire. Don’t be like me and try to use regular tape that falls off in a week.
Step-by-Step: Installing Your 220V Garage Outlet
🔒 Step 1: SAFETY FIRST – Shut Off the MAIN Breaker
This is non-negotiable. Go to your main electrical panel and flip the large main breaker to OFF. Verify power is off in the garage by testing an existing outlet with a voltage tester or lamp. This eliminates the risk of shock while working in the panel.
Step 2: Run Cable from Panel to Garage Wall
Plan your route from the breaker panel to your desired outlet location. Drill holes through studs as needed, keeping the cable run as straight and protected as possible. Secure the cable with staples every 4-6 feet. Leave plenty of extra wire (about a foot) at both the panel and the outlet box for easy connections.
Step 3: Install the Double-Pole Breaker
In your main panel (with power OFF), remove the cover. Snap your new double-pole breaker (e.g., a 30-amp or 50-amp) into two adjacent slots. Connect your black wire to one terminal and your taped-white (red) wire to the other terminal on the same breaker. Connect the bare copper ground wire to the ground bus bar.
Step 4: Wire the NEMA 6-50 or 14-50 Receptacle
At the outlet box, connect the wires to your heavy-duty receptacle. For a NEMA 6-50 (Welder Plug), connect the two hot wires (black and taped-white) to the two brass terminals. Connect the bare ground to the green ground screw. For a NEMA 14-50 (EV/RV Plug), connect the two hot wires to the two outer brass terminals. Connect the neutral (if your cable has one) to the silver terminal. Connect the bare ground to the green ground screw. Tighten all screws securely, carefully fold the wires into the box, and mount the receptacle and cover plate.
220V Outlet Wiring Diagrams (Visual Reference)
These diagrams show exactly where each wire connects. Bookmark this page for reference during your install.
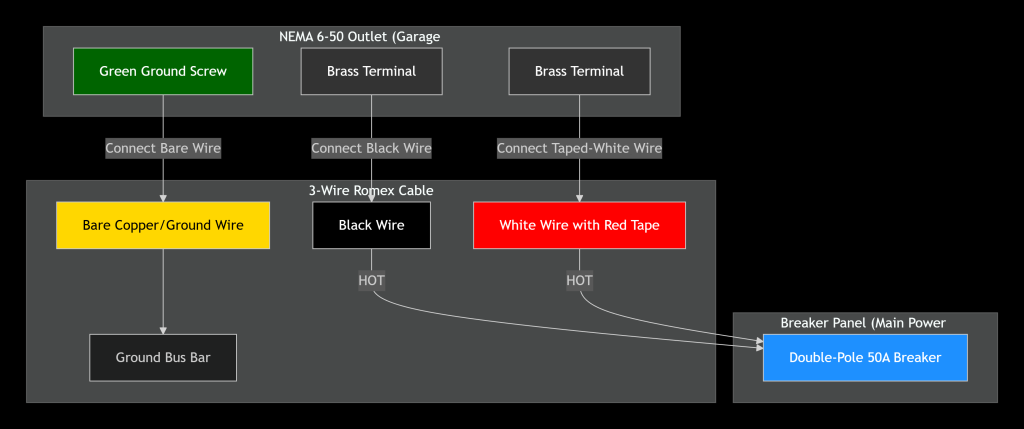
NEMA 6-50 Wiring Diagram (For Welders):
*(Insert a clear diagram here showing: Black Hot -> Brass Terminal, Taped-White/Red Hot -> Opposite Brass Terminal, Bare Ground -> Green Ground. Caption: “220V wiring diagram for a NEMA 6-50 outlet, commonly used for welders and large compressors.”)*
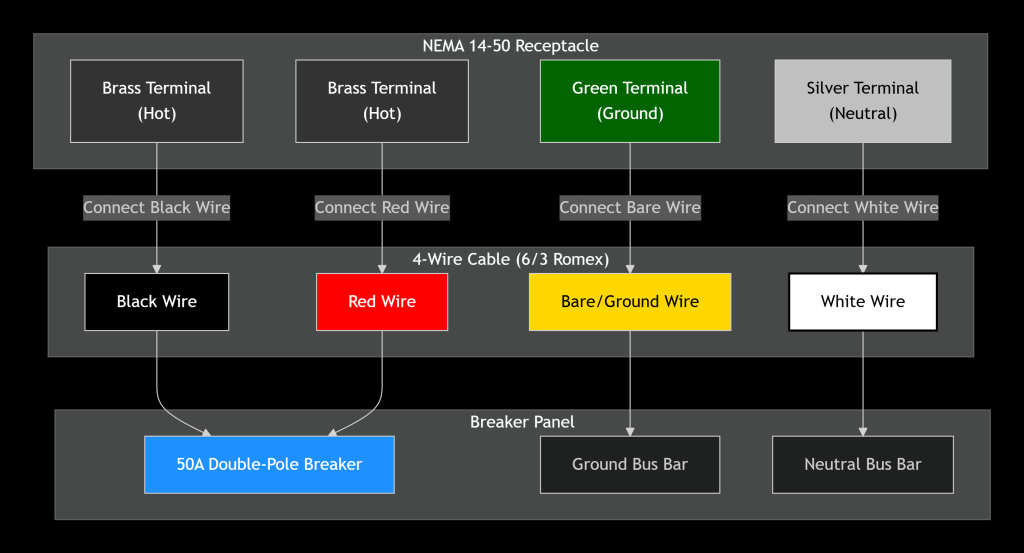
NEMA 14-50 Wiring Diagram (For EV Chargers & RVs):
*(Insert a clear diagram here showing the four terminals. Caption: “Wiring diagram for a NEMA 14-50 outlet, the standard for RV hookups and Level 2 EV chargers.”)*
Testing Your 220V Outlet: Is It Working Properly?
Start with a visual check to ensure all covers are on and no wires are exposed. Then, restore power by turning your main breaker back ON, then flipping the new 220V breaker to ON. Finally, test with a multimeter. Set it to AC voltage (V~) above 240. Insert the probes into the two hot slots of your new outlet. You should read approximately 240 volts.
Troubleshooting Common 220V Outlet Problems:
If the breaker trips immediately, you likely have a short circuit. Turn power OFF and check for any exposed copper touching another terminal or the metal box. It could also be a ground fault where the ground wire is accidentally touching a hot terminal, or you might have the wrong breaker type—verify you’re using a double-pole breaker, not two single-poles.
If the outlet shows no power but the breaker stays on, a loose connection is the cause 90% of the time. Re-tighten ALL connections in both panel and outlet. You may have also missed a connection—did you remember to connect BOTH hot wires to the breaker? While rare, a defective breaker is also possible; try a different one.
If the outlet gets warm or hot during use, this is critical. Your wire is likely too thin for the load—turn off immediately and upgrade wire gauge. A loose connection creating resistance can also cause heat, so tighten all terminals.
FAQ: 220V Garage Outlet Installation
1. Do I need a permit to install a 220V outlet myself?
In most areas, yes. Any new permanent circuit typically requires a permit and inspection. However, enforcement varies. My advice is to call your local building department. The permit fee is usually small ($50-100), and the inspection ensures you didn’t miss something dangerous. It’s cheap insurance.
2. Can I convert an existing 110V outlet to 220V?
No—and this is dangerous. 110V circuits use thinner wire (usually 14 or 12 gauge) that cannot handle 220V amperage. You must run a new, dedicated circuit with proper gauge wire as outlined in this guide.
3. What’s the difference between 220V, 230V, and 240V?
Practically nothing for your purposes. They’re all terms for the same higher-voltage service. Residential power is typically 240V, but tools are often labeled 220V or 230V. They’re compatible. Just wire for 240V and everything will work.
4. When should I definitely hire an electrician?
You should hire an electrician if your electrical panel looks confusing or has brands known for issues like “FPE,” “Zinsco,” or “Federal Pacific.” Also, if the panel is already completely full, if the thought of touching the main breaker terrifies you, if you need to run wire through finished walls or ceilings, or if local codes require a licensed electrician for this work.
5. Can I install a 220V outlet outside my garage?
Yes, but you need weatherproof components including a WR-rated outlet and a weatherproof cover box. The wiring principles are identical, but the outlet and box must be rated for outdoor use. Use conduit for the exterior portion of the run.
6. Do I need GFCI protection for a garage 220V outlet?
Current NEC code says YES for garages. However, many existing installations don’t have it. For new installs, use a GFCI breaker (more expensive) or a GFCI-protected outlet. For welders specifically, some manufacturers recommend against GFCI as it can nuisance trip.
7. How far can I run wire from my panel to the outlet?
Follow this rule of thumb: For a 30-amp circuit (10 gauge), the max is about 100 feet. For a 50-amp circuit (6 gauge), the max is about 140 feet. If you need longer runs, you may need to increase wire gauge because voltage drop over distance affects performance.
8. What if my panel is far from my garage?
You have a few options. You can run thicker wire to compensate for voltage drop, install a sub-panel in the garage (more complex but cleaner for multiple outlets), or consider if the tool can be placed closer to the main panel. The sub-panel route is best if you plan to install multiple 220V outlets in the garage.
9. Can I use aluminum wire instead of copper?
Technically yes, and it’s cheaper, but I don’t recommend it for DIYers. Aluminum requires special connectors, anti-oxidant paste, and careful torque specifications. Copper is more forgiving and what I’ve recommended in this guide.
10. How do I know if my electrical panel has room or capacity?
First, check for physical space: are there two open slots next to each other? Second, assess electrical capacity: look at your main breaker size (usually 100-200 amps) and add up your major appliances like A/C, dryer, and range. If you have a 200-amp service, you likely have capacity. If you have 100-amp service and electric heat, dryer, and range, you might be maxed out. When in doubt, consult an electrician for a professional load calculation.
Ready to Power Your Dream Garage Workshop?
Stop dreaming—start building. You’ve just unlocked professional-grade power in your garage for less than the cost of a nice dinner out.
Before First Use Checklist:
-
✓ All cover plates secured
-
✓ Area around outlet clear of flammables
-
✓ Tool manual reviewed for specific requirements
-
✓ First project materials ready (because you’re going to use this immediately)
Final thought: That satisfaction when your welder sparks to life or your compressor fills its tank for the first time? Priceless. And you did it yourself. Share your success: Tag us on social with your first 220V-powered project. We love seeing what our readers create.